
Anonabox vs. TorBox – Is It Time to Switch?
🚨 Why Anonabox is No Longer a Safe Option
Anonabox was once a game-changer in the privacy world, offering a plug-and-play Tor router for online anonymity. But in 2025, it’s become a major security risk.
🔹 No software updates → No new security patches since [last update year]
🔹 Outdated encryption → Vulnerable to modern attacks
🔹 Disappointed users → Many reports of instability and poor performance
If you’re still using Anonabox, it’s time to switch. The best alternative? Build your own Tor router using Raspberry Pi 4 and TorBox!
🔥 Best Anonabox Alternative: DIY Tor Router with Raspberry Pi 4 & TorBox
A self-hosted Tor router gives you full control over updates, privacy settings, and security configurations. Here’s how you can build one in just a few steps!
🔧 What You Need to Build a TorBox Router
🛠 Shopping List
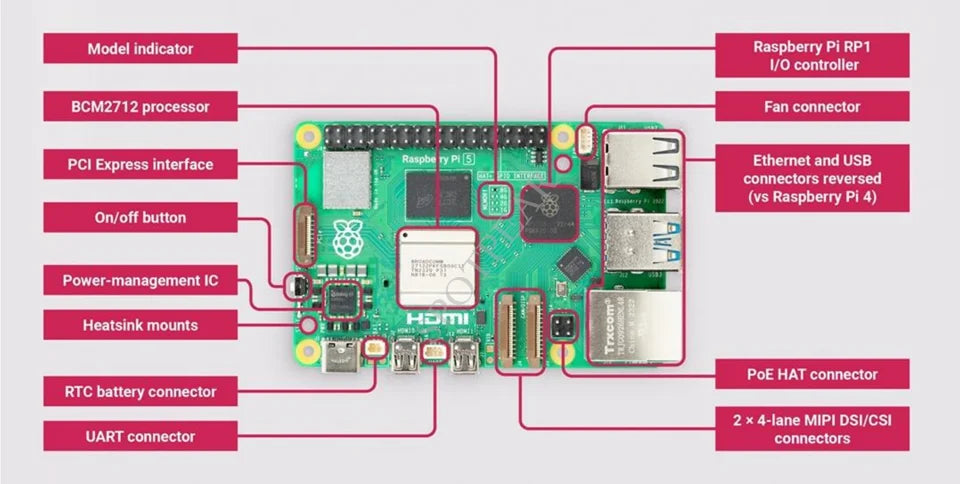
✅ Raspberry Pi 4 – The brain of your Tor router
✅ TorBox software – Open-source Tor routing system
✅ MicroSD card – For installing TorBox
✅ Ethernet cable – For secure network connections
✅ Power supply – Stable power source
✅ (Optional) Touchscreen case – For live network monitoring
📜 Step-by-Step Guide: Build Your TorBox Router
1️⃣ Assemble the Hardware
Install the Raspberry Pi in a case, insert the microSD card, and connect it to power.
2️⃣ Install TorBox
🔹 Download the latest TorBox image from TorBox GitHub
🔹 Flash the image onto your microSD card using Balena Etcher or Raspberry Pi Imager
🔹 Insert the SD card into Raspberry Pi, connect to the network, and power it on
3️⃣ Configure Your Tor Router
🔹 Connect to the TorBox Wi-Fi network
🔹 Login via SSH and change default passwords
🔹 Use the TorBox menu to customize security settings
💡 Why TorBox is Better than Anonabox?
| Feature | Anonabox ❌ | TorBox (Raspberry Pi 4) ✅ |
|---|---|---|
| Active Development | ❌ No updates | ✅ Regular security updates |
| Security Patches | ❌ Outdated | ✅ Community-maintained patches |
| Customization | ❌ Limited settings | ✅ Full user control |
| Hardware Support | ❌ Locked device | ✅ Works with Raspberry Pi |
📺 Adding a Touchscreen to Your TorBox (For Live Monitoring)
Want a real-time network display? Here’s how to add a touchscreen to your Tor router.
Install Touchscreen Drivers on Raspberry Pi:
📌 Get more driver updates here: GitHub Repository
🔒 Why You Should Switch to a DIY Tor Router
✅ Privacy First – No backdoors, no tracking
✅ Customizable Security – Add bridges, VPNs, and firewalls
✅ Future-Proof – Unlike Anonabox, your router stays updated
🚀 Ready to Build Your Own Tor Router?
🔹 Want the best online privacy?
🔹 Tired of outdated, insecure devices?
🔹 Looking for a future-proof, self-hosted solution?
👉 Build Your Secure Tor Router Now!
🛒 Check out privacy-enhancing tools & gadgets:
🔗 Privacy & Anonymity Collection
Anonabox vs. TorBox – Is It Time to Switch?
Is Anonabox Dead? Here’s What You Need to Know in 2025
I'll reviewed the Anonabox, a compact Tor router promising online anonymity. it is an intriguing gadget, but like many privacy-focused products, its longevity is uncertain. Recently, a reader from hamcodes reached out with some bad news about Anonabox—turns out, the project hasn’t aged well.
A quick search confirmed it: no recent updates, no security patches, and many disappointed users. If you’re still using Anonabox, you might be putting your privacy at risk. So, I decided to explore the best alternative in 2025.
Best Anonabox Alternative: Build Your Own Tor Router
If you’re serious about privacy, security, and anonymity, your best bet is to set up your own Tor router using a Raspberry Pi 4 and TorBox. This DIY approach gives you full control over updates, configurations, and security patches.
Building a Tor Router with Raspberry Pi 4 and TorBox

What You Need
To get started, here’s a basic shopping list:
- Raspberry Pi 4 – The heart of your Tor router
- TorBox software – The system that turns your Raspberry Pi into a privacy-focused router
- Touchscreen case – Optional but cool for monitoring your device
- Power supply – Stable power source
- Micro SD card – For installing TorBox
- Short Ethernet cable – For connecting to your home network
Step-by-Step Installation Guide
1. Assemble the Hardware
Setting up the Raspberry Pi 4 is straightforward. Install it in the case, insert the SD card, and connect it to power.
2. Install TorBox
- Download the latest TorBox image from the official website.
- Flash the image onto your microSD card using balenaEtcher or Raspberry Pi Imager.
- Insert the SD card into the Raspberry Pi 4, connect it to the network, and power it on.
3. Configure Your Tor Router
Once booted, follow these steps:
- Connect to the new Wi-Fi network created by TorBox.
- Login via SSH and change default passwords for security.
- Customize settings via the TorBox menu for enhanced privacy.
Why TorBox is Better than Anonabox
|
Feature |
Anonabox |
TorBox (Raspberry Pi 4) |
|
Active Development |
❌ No updates |
✅ Regular updates |
|
Security Patches |
❌ Outdated |
✅ Maintained by the community |
|
Customization |
❌ Limited settings |
✅ Full user control |
|
Hardware Support |
❌ Locked device |
✅ Raspberry Pi-compatible |
Adding a Touchscreen to Your TorBox
Want to monitor your traffic on the go? If you’re using a touchscreen case, follow these steps to install drivers manually:
sudo rm -rf LCD-show
git clone https://github.com/goodtft/LCD-show.git
chmod -R 755 LCD-show
cd LCD-show/
sudo ./LCD35-show
You can find more driver updates on the GitHub repository.
Why You Should Switch to a DIY Tor Router
- Privacy First: Control your data, updates, and security patches.
- Customizable Security: Add bridges, VPNs, and firewall rules for maximum anonymity.
- Future-Proof: Unlike Anonabox, this setup will stay updated for years.
Final Thoughts
If you’re still using Anonabox, it’s time to upgrade to a Raspberry Pi 4 with TorBox. It’s cheaper, more secure, and actively supported by the community.
Stay anonymous. Stay secure. Build your own Tor router today!Anonabox alternative, Tor router, Raspberry Pi TorBox, online privacy, cybersecurity, DIY Tor router, secure browsing